
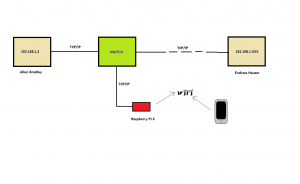
We can turn Raspberry pi 3 as AP(Access point) and can be utilized with wireless devices to scan PLCs or field devices network.
Requirements:
1.Raspberry pi 3
2.Power Supply (for Raspberry)
3.Wireless device ( tablet, laptop, or cellphone)
4.Ethernet cable
Keep in the mind that the following procedure is for Raspberry Pi 3 (Jessie raspbian) which I am quite sure it might work for some older versions with slightly modifications. I got the script from several sources online and I did modification to work on PLC network that use static IP addresses.
1.Install hostapd, udhcpd and iptables
- sudo apt-get update
- sudo apt-get install hostapd udhcpd -y
- sudo apt-get install iptables -y
2. Create back up for these files, in case of installation failed.
- sudo touch /etc/network/interfaces.bak
- sudo cp /etc/network/interfaces /etc/network/interfaces.bak
- sudo touch /etc/dhcpcd.bak
- sudo cp /etc/dhcpcd.conf /etc/dhcpcd.bak
3.Build the following script (mywifi.sh).
Basically this script is to create several configuration (conf) files and will load them into default ones. DHCP (Dynamic Host Configuration Protocol) configuration will give away the dynamic IP addresses between 192.168.42.2 and 192.168.42.20 to your wireless devices and to access wlan0 meanwhile it will give a static IP address for raspberry pi: 192.168.42.1 . For older version , it is necessary to setup configuration on /etc/network/interfaces for interfacing with network (wlan0,eth0, etc ) but on newest Jessie installation, the network configuration is located on /etc/dhcpcd.conf . HostAPD configuration will create hotspot and APN ( Access Point Name). The next is NAT (Network Address Translation ) which works as a translator between external router that connect to eth0 and WIFI guests who access wlan0. :
- #! /bin/bash
- #1. Configure DHCP----------------------------------------------
- x=tem.tem
- touch $x
- sudo rm -rf /etc/default/udhcpd
- #sudo mkdir /etc/default
- sudo touch /etc/default/udhcpd
- echo "start 192.168.42.2 " >> $x
- echo "end 192.168.42.20" >> $x
- echo "interface wlan0" >> $x
- echo "remaining yes" >> $x
- echo "opt dns 8.8.8.8 4.2.2.2" >> $x
- echo "opt subnet 255.255.255.0" >> $x
- echo "opt router 192.168.42.1" >> $x
- echo "opt lease 864000" >> $x
- sudo mv $x /etc/udhcpd.conf
- touch $x
- echo "# Comment the following line to enable" >> $x
- echo "#DHCPD_ENABLED=\"no\"" >> $x
- echo "# Options to pass to busybo>> $x
- echo "DHCPD_OPTS=\"-S\"" >> $x
- sudo mv $x /etc/default/udhcpd
- #give the Pi a static IP address
- sudo ifconfig wlan0 192.168.42.1
- #2.------------------------------SETUP AP (Access Point) Interface -------------------------------
- touch $x
- echo "source-directory /etc/network/interfaces.d" >> $x
- echo "auto lo" >> $x
- echo "iface lo inet loopback" >> $x
- echo "" >> $x
- echo "auto eth0" >> $x
- echo "iface eth0 inet dhcp" >> $x
- echo "" >> $x
- echo "iface wlan0 inet static" >> $x
- echo " address 192.168.42.1" >> $x
- echo " netmask 255.255.255.0" >> $x
- echo " wireless-power off" >> $x
- echo "" >> $x
- echo "iface default inet dhcp" >> $x
- echo "up iptables-restore < /etc/iptables.ipv4.nat" >> $x
- sudo chmod --reference=/etc/network/interfaces $x
- sudo chown --reference=/etc/network/interfaces $x
- sudo mv $x /etc/network/interfaces.ap
- sudo chmod --reference /etc/network/interfaces.bk /etc/network/interfaces.ap
- #3. Configure HostAPD------------------------------------------------
- touch $x
- echo "interface=wlan0" >> $x
- echo "driver=nl80211" >> $x
- echo "ssid=WifiPLC" >> $x
- echo "hw_mode=g" >> $x
- echo "channel=6" >> $x
- echo "macaddr_acl=0" >> $x
- echo "auth_algs=1" >> $x
- echo "ignore_broadcast_ssid=0" >> $x
- echo "wpa=0" >> $x
- echo "wpa_passphrase=My_Passphrase" >> $x
- echo "wpa_key_mgmt=WPA-PSK" >> $x
- echo "wpa_pairwise=TKIP" >> $x
- echo "rsn_pairwise=CCMP" >> $x
- echo "ieee80211n=1" >> $x
- echo "wmm_enabled=1" >> $x
- echo "ht_capab=[HT40][SHORT-GI-20][DSSS_CCK_40]" >> $x
- sudo mv $x /etc/hostapd/hostapd.conf
- #4. Configure NAT--------------------------------------------
- touch $x
- echo "DAEMON_CONF=\"/etc/hostapd/hostapd.conf\"" >> $x
- sudo mv $x /etc/default/hostapd
- touch $x
- sudo sh -c "echo 1 >> /proc/sys/net/ipv4/ip_forward"
- sudo echo "net.ipv4.ip_forward=1" >> /etc/sysctl.conf
- sudo iptables -t nat -A POSTROUTING -o eth0 -j MASQUERADE
- sudo iptables -A FORWARD -i eth0 -o wlan0 -m state --state RELATED,ESTABLISHED -j ACCEPT
- sudo iptables -A FORWARD -i wlan0 -o eth0 -j ACCEPT
- sudo sh -c "iptables-save >> /etc/iptables.ipv4.nat"
- #------------------------------5. Fire it up! R----------------------------------------
- sudo service hostapd start
- sudo service udhcpd start
- #-----------------------------6.get the hotspot to start on boot----------------------
- sudo update-rc.d hostapd enable
- sudo update-rc.d udhcpd enable
- #------------------------Create wifiConnect.py------------------------------------
- sudo apt-get install dnsmasq -y
- sudo service dnsmasq start
- sudo update-rc.d dnsmasq enable
- sudo apt-get install udhcpc -y
4.Create AP.sh script
- sudo nano AP.sh
- #! /bin/bash
- #sudo cp /etc/init.d/hostapd.bak /etc/init.d/hostapd
- #sudo cp /etc/init.d/udhcpd.bak /etc/init.d/udhcpd
- sudo /etc/init.d/hostapd stop
- sudo /etc/init.d/udhcpd stop
- sudo ifdown wlan0
- sudo ifconfig wlan0 down
- sudo rm -rf /etc/network/interfaces
- sudo cp /etc/network/interfaces.ap /etc/network/interfaces
- sudo ifconfig wlan0 up
- sudo ifup wlan0
- sudo service hostapd start
- sudo service udhcpd start
- sudo service hostapd status
Run mywifi.sh and AP.sh
- sudo ./mywifi.sh
- sudo ./AP.sh
If there is no errors , you should able to see SSID name “WifiPLC” on your wireless devices under WIFI setting menu. Login and when ask the password, type “My_Passphrase” that will save and connect it to your wireless devices. To test it, connect eth0 (ethernet port) on Raspberry Pi to DHCP router that connect to Internet. The router will assign a dynamic IP address . Now you are able to connect to Internet. Type “www.google.com” on your phone browser to verify it.
This is last step if you need a static IP and skip it if you just need dynamic IP address . Eth0 still has a dynamic IP address and will not communicate with PLC static IP address network. Identify gateway address and check all existing PLC IP address and find a static IP address for Raspberry PI that will not cause conflicts with other numbers. In this example the gateway is 192.168.1.1 and the number has not been used by other PLCs is 192.168.1.50. To activate a static IP address, add the following to the very bottom of /etc/dhcpcd.conf file.
- # static IP setup
- interface eth0
- static ip_address=192.168.1.50/24
- static routers=192.168.1.1
- static domain_name_servers=192.168.1.1
Save it as /etc/dhcpcd.conf.
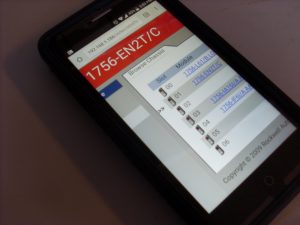
Reboot your Raspberry Pi , connect Ethernet port to a PLC router. Now if you have PLC CPUs or Ethernet modules which have “192.168.1.xx ” , type those number on your browser. Let says “192.168.1.33”. Most new Field devices or PLCs have HTTP protocol capability on port 80/8080, so you will see something like this :
Using Raspbian shell terminal, we can find MAC number using “arp’ command, install “nmap” utility to explore and troubleshoot the network such as scanning particular IP address blocks, checking open/closed ports etc.